9.28.2014

RoboGoby Version 1 and the Plan for Version 2

It has been quite a summer for Project RoboGoby. Near the deadline for most of the Limbeck crew's college departures, we held an official launch for the first generation of the RoboGoby submersible. The design outperformed our hopes for the alpha version, bringing a favorable close to the first chapter of the Limbeck Engineering story. Below is some footage of the launch event, edited together from the various videos taken:

Full Promotion:


Just Footage of the Robot at Work


However, Project RoboGoby is not over. This year, the project will be moved to Baxter Academy in Portland, where Limbeck Engineering will work to both create a production-ready beta type of the robot and to teach and manage a group of students at Baxter as they help work on the project. Of course, this means that Limbeck Engineering will again be reaching into their own pockets and out into the community for support.

On Friday, Josef - the member of our team still at Freeport High School - attended the Envision Maine Summit in Freeport. The summit's purpose was to help build an innovative and entrepreneurial community in Maine. We at Limbeck Engineering would like to thank everyone at the summit for showing enormous support for our project. Specifically, we would like to thank Coffee by Design for their generous support and sponsorship in kicking off the fundraising for gen 2 of RoboGoby. Here is a video of our Josef's speech at the event:

http://www.youtube.com/watch?v=QtNIzftTrVI

In the coming months, we will continue to update the blog on our progress with the students at Baxter Academy - though we won't begin working with the students until their second trimester starts. In the meantime, we will begin building a business plan for the second phase of the project, including our technical goals, our financial requirements and our fundraising plans.


7.13.2014

Camera and Embedded Linux Pots (and shelves)

For the last could of days we have been working on fitting the LEDs, their heat-sinks, and all three cameras into the dome port. This was a very tedious process but it is now complete.

In the process of fitting the cameras into the front of the sub we had to take into account that they would be in boxes that we 3D print. The boxes will hold the cameras' control boards and will then be filled with epoxy. Putting them in epoxy makes them waterproof and thus allows us to flood the whole submersible. We created a box that had three separate compartments, two for the Raspberry Pi cameras and one for the webcam. On the back of the box there is a mount for the rod on the servo to attach to. It is impossible for this part to be printed in one piece so we broke it up into three separate pieces for printing. An image of the final potted camera setup is below:


We then moved on to printing the boxes for the embedded Linux microcomputers. We have two boxes, two for our Raspberry Pi's and one for the BeagleBone Black. Both containers are going to be filled with thermally conductive epoxy in order to keep out electronics cool. We decided to place the BeagleBone/shield combination face-up in the container while we put Raspberry Pi's upside down. This made the 3D printing a lot easier although it did add to the amount of epoxy we needed to use. An image of all three potted computers is below:


After creating the boxes we also needed to make a way to hold them in place. In the end we created three shelves we put the two RPi's on the top and bottom of the middle section and put the BeagleBone in the middle of the front section. We are also going to put the IMU on top of the BeagleBone so it doesn't need its own space.

6.13.2014

BeagleBone Capes

After choosing the sensors and getting the software complete, we needed to create the sensor Capes for both BeagleBone Blacks (one on the float and one in the sub). For the BeagleBone Black on the float we attached the connectors for the stepper motors, the GPS module, a compass, a temperature probe, and a battery measurement circuit. The actual making of this cape took an unexpectedly long time, although it turned out very nicely:


The BeagleBone on the float has to be supplied with 5v. To do this we decided to use voltage dividers. This task took longer than expected as dropping the 25.6v from the battery had a few different issues. Originally we were going to use the LM317. This variable voltage regulator should have given us a constant voltage supply by choosing the right resistors (based on the formula). Sadly as the voltage supply to the LM317 dropped, so did the voltage output.


We then moved on and chose to use the simple UA7805 5v regulator. This chip can talk up to 24v and regulate it to 5v. As the rating on the 7805 was only 24v we decided to first step own the voltage using the LM317s we already had and then using the 7805 to get the exact 5v we required. Our float also needed a second 5v 1A power supply so we decided to create two of these circuits in parallel (as the chips can only handle a certain amperage). An image of the final regulator is below:


The second BeagleBone Cape we made is for the sub. This Cape is also fairly simple. It contains the MOSFET controllers for varying our LED brightness, the IMU, the depth sensors, the temperature sensor, and a few extra pin-outs for any future sensors. An image of the Cape for the submersible is below:


6.10.2014

Choosing a Camera

For the last few week we have been trying to make a final decision about what will be in the dome of the submersible, especially which cameras we will use. Originally we just had two pi cameras on a rod so they could be tilted up and down.

We then moved on to have the LEDs inside the submersible, putting them in between the two cameras. This worked well while we were planning on a 6" diameter submersible as the pi cameras were small enough, but once we changed to a 4" it didn't fit well.


Vertical LEDs between cameras


Thirdly we decided to have either two pi camera's or two webcams and no LEDs. The pi cameras fit more easily but didn't stream as nicely, so we thought about using webcams. Because most webcams are fairly long in one dimension they were going to have to stand up and would take most of the room. We then decided to buy a nice webcam and see how it fit. When it arrived we found that it was much bigger than the other (being about 3.25" long).


LED modules with two Pi-Cameras


With the new cameras and the decision to try and move the LEDs back inside the dome with the cameras we changed our plan entirely. We decided to have one nice webcam for streaming video, and having two pi cameras on board to do stereoscopic vision.

3 Cameras with LED strip


Another factor in choosing our cameras has been the video quality. After testing various different streaming methods (all can be found here) we settled on using a combination of cameras. For the live video feed we settled on using MJPG-Streamer on the BeagleBone with Logitech's C920. For the stereoscopic vision we decided to use two Raspi-Cameras. Both can be seen in the CAD images above (RPi are the small square ones, the C920 is the long one). While driving, the user will only be using the C920. The RPi cameras will only be used to take images and record video (and are specifically placed where they are for stereoscopic vision. An image of the C920 out of it's case is below:


MJPG-Streamer was chosen out of the various different streaming methods (GStreamer, Motion, FFMPEG, MPlayer w/ Netcat) because of its speed and compatibility. Not only can it handle 30 fps, but the stream can be picked up by OpenCV running on the OCU.

The last step with the cameras was potting them. We 3-D printed boxes for the cameras to fit inside of, as well as a place for a rod to go through the system so it could be tilted. The picture below is of the cameras epoxied into their boxes, and below that is a CAD model of the entire system in place.

6.08.2014

Finishing the LEDs

After spending many hours designing a various different heat-sinks for the LEDs, we settled on putting the LEDs on the outside of the acrylic dome to minimize the reflection and interference with our cameras. Space has also been another huge issue for our LED setup. To minimize the space used by these LEDs, we have decided to put them into a 12mm pipe (10mm ID) attached to a 10mm rod.

The LEDs will be glued onto a copper strip and then onto a 10mm aluminum rod. This unit will then slide into the larger 12mm rod. The lens will be glued into the end of the pipe and the wires will come our via slots in the aluminum piping.

After routing out the aluminum pieces (shown below) we glued the LEDs to the copper strips, soldered on the power and ground wires, and covered the wire leads in order to ensure that electrical jumping did not occur. We then attached the copper to a 10mm rod and were done building the heat-sinks!


In order to have the lights on outside of the water and at variable brightnesses in the water we are using pulse width modulation (PWM) to control them. By wiring the LEDs to our 12v power supply on the sub and then using a MOSFET (metal-oxide-semiconductor field-effect transistor) we were able to translate the variable pulses to variable brightness on the LED.  The MOSFET can be attached by sending DATA to the gate pin, attaching the GROUND of your LED to the drain pin, and finally attaching the GROUND of your power source to the source pin.


After wiring up the MOSFET you can easily control is using the RPi.GPIO library on your Raspberry Pi. Read this post to get a handle on the basic concepts of PWM control. By simply sending varied duty cycles to the gate pin, you will get a variable brightness LED. Below is a small clip of the LED pulsing using the MOSFET and RPi.GPIO:


6.05.2014

Finishing the Spool

After another round of testing, we were able to finalize the design for the spool on the float.

After receiving 230 feet of 10 gauge wire from Matt Anderson in December, we twisted and coiled the two wires together. We did this thinking that in the future we could easily add some flotation and be done with the tether.

A few months later, we decided to finally finish the tether. We measured the density of the wire, and then purchased 250 feet of 1/4" foam cord for flotation. To cover the wires and foam cord we purchased an expandable polyester sleeving. After uncoiling and then untwisting the wire, we tapped on the foam cord and then spend a few hours pushing on the expandable sleeving. Below is an image of the wire, foam, and polyester sleeving combination.


We also took a time-lapse video of the processes:


After finishing with the tether, we also finalized the power transfer on the float. We had tried a few different ways of transferring the power from the battery to the spool. At first, we tried to transfer electricity through the ball bearings we are using on the spool. Unfortunately those provided too much resistance as the contact points between the balls and the metal rings were extremely small.  We looked into a few other options and final decided to use a brushed system to transfer power from the batteries to the tether on the spool. 

The final design of the spool consists of the brushed system you see below. The brush is made using a threaded copper rod and copper tubing. The threaded rod is inserted into our support braces and attached to the power coming from the battery. The rub is soldered onto the rod leaving just enough room for the brush. After reaching the rod, the power is transferred into the tube and then through the brush onto the metal plate shown below. This plate is wired into the tether and thus provides the submersible with power. An image of the final brushed system is below:


5.24.2014

BeagleBone and DS18B20 Temp Sensor

After deciding to switch over the the BeagleBone Black, we have been reconsidering using an Arduino to measure environmental variables. Using the numerous I/O pins on the BBB is not only easier, but more efficient in size and speed. We've also decided that we will not be purchasing pH, DO, and Salinity sensors for the prototype...they will be add-ons for those who want them.

Before starting, read this quick explanation on device tree overlays on the BeagleBone. After understanding the basics of pin-muxing.

Also refer to this post by HipsterCircuits (much of the following taken from the post). That post is the basis for the explanation below.

Then download the device tree overlay package (can't use apt-get as that package does not have the -@ compiler) use Robert C Nelson's source install:


After installing the software, make the file executable, and then run the bash file to install device-tree-overlay (dtc) from the source:


Then copy and paste the code found in this post to BB-W1-00A0.dts (by creating this file).

Compile the .dtbo file:


Copy the .dtbo file to /lib/firmware:


Mux the pins (this must be done on every reboot -- we added it to the init section of our script):


Attach the DS18B20 one-wire temperature sensor. Use a 4.7k resistor to attach the sensor (for more information read this post). Then attach the white wire to "P9_22", the black wire to "P9_46", and the red to "P9_3".

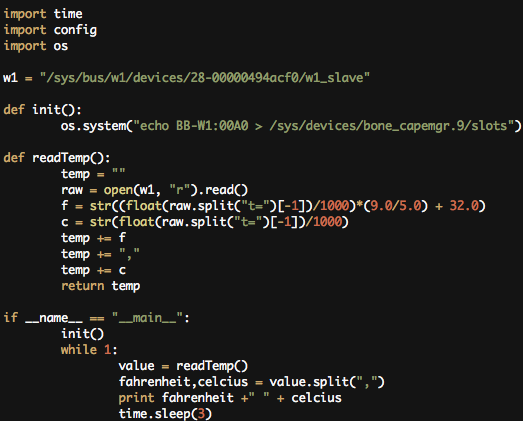
After muxing the pins and attaching the sensor you should see a new device appear in /sys/bus/w1/devices. Use this unique id (ours was 28-0000049acf0) to replace the ID in the code below.

Create a python file similar to the image below (download can be found here):


And this is the output on the BeagleBone:


As you can see, this is not entirely accurate, but a .5 accuracy will work fine for our project. The pressure is also calculated using 14.7 psi, which should atmospheric pressure at sea-level.

This surprisingly easy setup will be useful for our project. By embedding this sensor code as part of a python module in our project, we will be able to easily read the temperature both above and below the surface of the water.

5.21.2014

BeagleBone: MJPG-Streamer + C920

One reason for testing the BeagleBone Black was because of its processing capabilities. After some research it seemed as if it would work well streaming video. We decided to try MJPG-Streamer (which we had previously tried here on the Raspberry Pi) with Logitech's C920 Webcam. We chose to use this camera because of its HD capability, onboard H264 video encoding, and USB compatibility. Below is the camera taken out of its case:


The dependencies need on the BeagleBone and for the C920 are slightly different. First update and upgrade your operating system to insure that everything is up-to-date:


Below is a list of the correct dependencies. All work with apt-get install (for example, to install g++ use sudo apt-get install g++):

  • g++
  • cmake
  • build-essential
  • imagemagick
  • pkg-config
  • libv4l
  • libv4l-dev
  • v4l-utils
  • v4l2ucp
  • libjpeg8-dev

Now with the dependencies installed you can download MJPG-Streamer from our forked repository:


Make a symbolic link to the videodev2.h file:


Finally, install MJPG-Streamer:


After setting everything up there still may be an error that says the V4L2 Device isn't loaded. This happens because the uvccamera module is not loaded. To load the module:


You might need to switch between loading and unloading the module to get MJPG-Streamer to work. To unload the uvcvideo module use this command:


To play the video use the MJPG-Streamer commands and view it from the webserver (https://<localhost>:8080)!:


 You should see a 1280x720 image with 30 fps! A clear, crisp, and speedy stream. Perfect for the submersible. After a long, long journey looking into the different streaming methods available, it seems that MJPG-Stream is the best option for our project.


5.20.2014

RasPi Camera: MPlayer and Netcat

After using GStreamer while moving the base of the camera we found that the image became very distorted. Using this in our submersible therefore wouldn't be possible. We then looked into other streaming methods using the Pi camera.

Although the MPlayer and Netcat combination is the recommended streaming method for the Pi's h264 video it wasn't as fast as we had wanted at first and had terrible latency. This combination almost matched MJPG-Streamer in speed, but unfortunately did not do well with a lot of movements at once.

Software:

  • Netcat (Windows) ---> Chrome might block this download. Try Internet Explorer.
  • MPlayer (look in MPlayer and Netcat for Windows folder)
Both of the above programs are located on our download page precompiled. The Netcat download should already be compiled and we thought it would be nice to share the MPlayer software as it was difficult to compile. If you would like to compile from source you must first download MinGW and then use its GCC compiler (directions on doing this can be found here). If you would rather not, the MPlayer download can be found on our downloads page in the folder MPlayer and Netcat can be found using the link above.

After installing MPlayer and Netcat on your Windows machine, streaming the video is extremely easy.

Command on the Raspberry Pi (w/ RasPi Camera):


Command on the Windows machine within the directory containing both MPlayer and Netcat:


And it's that easy!

We have found that in order to decrease the video latency, stream from the pi at a specific bite-rate (-b) and at a smaller frame rate then MPlayer is reading the stream, but it does not even compare in speed to other streaming methods.

This streaming method is the expected streaming method for the Raspberry Pi camera. Although there are ways to speed up the stream (namely reading the video at 60 fps while streaming it at 30 fps) they are not realiable. At points it streams video with low-latency, but at others it lags unexpectedly. Our next video post will have our final video streaming decision....

5.19.2014

Measuring Battery Life -- BeagleBone Black

As part of our float we want to be able to constantly check the battery life of our submersible. To do this we wanted to be able to use the BeagleBone. Because the ADC (Analog Digital Converter) on the BBB (BeagleBone Black) has a max voltage of 1.8v, we needed a way of dropping the 24v battery. To do this we used a voltage divider. By using the voltage divider to step-down the 24v to <1.8v we are able to accurately measure voltage by using a simple ratio. With this measured voltage we can make sure that our 24v LiFePO4 batteries never drop below 20v (the voltage is each cell should be 3.2v when fully charged and 2.5 when empty)


First, we needed to calculate the Vout using the voltage divider formula:


We needed a voltage <1.8v and therefore used a 47 ohm and a 1k ohm resistor to drop the 25.6v to approximately 1.15v.

Vout = 25.6(47/1047)
Vout = 1.15

By measuring the voltage across R2 (from Vout to Ground) you will see a voltage of around 1.15v


Next you need to use Ohm's Law and Joule's Law to calculate the power consumption of the resistors. Using V=IR and Wattage=I^2R you should find the power consumption of R1 to be a little over .5W (as a shortcut you can use this calculator).

Our setup uses 2W resistors and still gets a little hot, although this is expected while using resistors and high powered devices. Also make sure that R2 is less than 1K ohms as that will interfere with the analog readings.

To measure the voltage with the BeagleBone we used the ADC capabilities Adafruit's BBIO Library. By residing the voltage periodically and then comparing it to a pre-determined ratio we're able to accurately measure the battery life. An image of the code is below:


If you would like to download the code we used find it at our GitHub Page

5.17.2014

LED Heat Sinks

For a couple of weeks we have been trying to figure out how to situate our LED lights so that they don't cause problems with drag or camera view. We have tried about a dozen different options and have switched back and forth between them a bunch of times.

The original idea was to put them in a ring around the submersible. This was quickly scrapped as it takes a lot of material, adds to surface area, and would be hard to machine.


LEDs in a Ring around Submersible


We then realized that it would be easier to create sections of the ring that each house an LED light and spread them around the submersible. This still had some of the same problems and meant that each light that broke would need an entirely new housing that would have to be custom created.


LED module for outside
We were advised to use pre-made heat sinks and just create a mounting bracket of sort for the LEDs. The LEDs would then go inside of the submersible between the camera's and rotate on the same rod. This looked like a great solution at the time and meant we could use fewer lights (as the same ones would look down and forward). Unfortunately we then made the decision to use 4" PVC for our submersible. After creating a CAD model we found it was almost impossible to fit this inside of a 4" pipe.

Triangle for 3 LEDs

Triangle heat sink (bigger holes for the lens)


We then went back to external modules, but made them so that the LEDs could be replaced without having to replace the entire module. Again we were advised against this and tried to fit the LEDs into the inside.

We came up with a couple different ways to do it: putting and LED strip across the top or bottom or, alternatively, putting them vertically. While changing to this design we also made some changes to our camera layout. We decided to have both a webcam for video streaming and two pi cameras for stereoscopic vision, and this makes the dome much more crowded and so harder to work with.

Strip across the bottom

Vertical LEDs  strip between cameras


5.10.2014

Float V2: Spooling Half

We have just recently finished creating the half of the second version of our float. After looking at the finished first float, thinking about its function, and contemplating its size, we realized that it was overkill. We came up with a solution which is sleek and more effective.

Float V2 is made out of of two pontoons connected together using PVC bracing. One side contains the spool and the spooling motors (the spool happened to fit inside the pontoons perfectly) while the other contains our batteries, wireless communication device, and other electronics. An image of the spool in the pontoon is below:


We first made the bracing to hold the two floats together. We did this using some inch-and-a-half PVC pipe that we had lying around from the previous version.

To attached the large spooling motor we then found that, using the same Plexiglas mounting plate we had used last time, we could easily line up the pulley on the motor to the pulley on the spool. We held the motor to the top using a u-bolt which also allows us to tighten/loosen the driving belt (refer to the image above).

To attach the motor used to organize the tether, we drilled four holes in the top of the pontoon and attached the motor using 4 bolts and the motor's mounting face. We then needed to create another gear at the opposite end of this motor to attach the belts used to organize the tether (for more specifics on this idea check out our previous blog post). We realized that this motor's shaft lined up perfectly with the u-bolt used to attached the motor on the other side of the pontoon. We then created a piece of Plexiglas which could be put on the u-bolt and would have a ball-bearing that holds the second pulley in our system. An image of this motor is below:


By nature u-bolts can be raised and lowered. This allows for tensioning of the spool's driving belt. By adding slots on the pontoon for the u-bolt we were also able to easily tension the organizational belt.

Below is the finished V2: Part 1 of out float (and Nick)!


4.25.2014

BeagleBone Black: UART + GPS

Setting up a GPSd client on the BeagleBone was very similar to setting one up on the Raspberry Pi. The difference in this setup is that the GPS data will be read using the UART capabilities of the BeagleBone. Not only does this free up the USB port on the BeagleBone, but allows us to use a stronger 66 channel GPS (not the one with a built in USB cable).

We used Adafruit's 66 Channel Ultimate GPS along with the powerful BeagleBone Black embedded linux device. The GPS we used is pictured below:


Similar to this post, we will be using GPSd on the BeagleBone. Downloading and installing GPSd is easy:


UART on the BeagleBone Black can be configured in a number of different ways. The BeagleBone uses devices tree overlays to configure its I/O pin capabilities. Before continuing, read this summary on device tree overlays. There are a total of 5 UARTs available on the BeagleBone. Each of these communication options vary and include single or bidirectional control. This table was helpful in finding the correct pins when configuring UART with the pre-installed device tree overlays.


Check in /dev to see the UART devices available (there should only be one -- it's connected to the USB port):


Check the /lib/firmware directory for the .dtbo files (if you don't have these files continue reading...):


If these .dtbo files are not included in you Bone kernel, update your image (Saucy 13.1 works well) or download and install the Adafruit_BBIO Library. For more information on how to update your image or software read this post. If the UART overlays are available, continue reading.

Attach the UART you want by using the Cape Manager on the BeagleBone. What this does is imitate a cape (similar to an Arduino "shield") on the BeagleBone and gives you direct access to the pins you would like to use. This can be everything from PWM to UART to GPIO. To do this, echo the UART you would like to use to slots which is located in /sys/devices/bone_cape.#/ (the # depends on the Bone kernel you have). You must be root to do this (sudo su).


Now you should see /dev/ttyO4 as a new device:


Now plug in your GPS module (UART 4 pins):

===================
PWR----->P9_3
GND----->P9_1
RX-------->P9_11
TX-------->P9_13
===================


...and read the incoming NMEA data:


To connect the UART device /dev/ttyO4 with gpsd use this command:


To read the GPS using Python, you can download our repository for the BeagleBone Black. For the latest code clone BBB.git:


And then run the Python script in the gps folder:


To check if the GPS is receiving data use the cgps -s command. You should see something similar to the image below:


Again, this capability will be used on the float. To attach our GPS module we will be creating custom PCB Capes...stay tuned to see how the boards turn out!