
Showing posts with label Video. Show all posts
Showing posts with label Video. Show all posts
6.20.2015
Choosing a Camera – Update
The search for a camera to use in our robot has been long and involved. Throughout the process, we have worked toward finding a camera that satisfied a basic set of requirements. Our camera needs to be capable of outputting high quality video, interfacing with C++ or Java through the Beaglebone black, and be capable of stereoscopic imaging. We believe we have finally found a camera that can satisfy all of those requirements: the DUO MLX.
This camera, while expensive, boasts an impressive array of features and capabilities. It stereoscopic and infrared, allowing it to judge depth in low light environments. It comes equipped with a small array of programmable infrared LEDs and an on-board 9-DOF freedom IMU, allowing it to sense its orientation with a high degree of accuracy. Finally, it comes with a SDK which, just recently, allows it to interface with ARM based micro-controllers like the Beaglebone - although access to this capability requires subscription to DUO's developer program. This SDK is compatible with C++ and C, as well as Java through the Java Native Interface. Another distinct advantage of this camera is its form factor. It is very small, being only 52mm long. This will allow us to fit many more design features into the front portion of the submersible.

6.10.2014
Choosing a Camera
For the last few week we have been trying to make a final decision about what will be in the dome of the submersible, especially which cameras we will use. Originally we just had two pi cameras on a rod so they could be tilted up and down.
We then moved on to have the LEDs inside the submersible, putting them in between the two cameras. This worked well while we were planning on a 6" diameter submersible as the pi cameras were small enough, but once we changed to a 4" it didn't fit well.
Thirdly we decided to have either two pi camera's or two webcams and no LEDs. The pi cameras fit more easily but didn't stream as nicely, so we thought about using webcams. Because most webcams are fairly long in one dimension they were going to have to stand up and would take most of the room. We then decided to buy a nice webcam and see how it fit. When it arrived we found that it was much bigger than the other (being about 3.25" long).
With the new cameras and the decision to try and move the LEDs back inside the dome with the cameras we changed our plan entirely. We decided to have one nice webcam for streaming video, and having two pi cameras on board to do stereoscopic vision.
Another factor in choosing our cameras has been the video quality. After testing various different streaming methods (all can be found here) we settled on using a combination of cameras. For the live video feed we settled on using MJPG-Streamer on the BeagleBone with Logitech's C920. For the stereoscopic vision we decided to use two Raspi-Cameras. Both can be seen in the CAD images above (RPi are the small square ones, the C920 is the long one). While driving, the user will only be using the C920. The RPi cameras will only be used to take images and record video (and are specifically placed where they are for stereoscopic vision. An image of the C920 out of it's case is below:

MJPG-Streamer was chosen out of the various different streaming methods (GStreamer, Motion, FFMPEG, MPlayer w/ Netcat) because of its speed and compatibility. Not only can it handle 30 fps, but the stream can be picked up by OpenCV running on the OCU.
The last step with the cameras was potting them. We 3-D printed boxes for the cameras to fit inside of, as well as a place for a rod to go through the system so it could be tilted. The picture below is of the cameras epoxied into their boxes, and below that is a CAD model of the entire system in place.
We then moved on to have the LEDs inside the submersible, putting them in between the two cameras. This worked well while we were planning on a 6" diameter submersible as the pi cameras were small enough, but once we changed to a 4" it didn't fit well.
 |
| Vertical LEDs between cameras |
Thirdly we decided to have either two pi camera's or two webcams and no LEDs. The pi cameras fit more easily but didn't stream as nicely, so we thought about using webcams. Because most webcams are fairly long in one dimension they were going to have to stand up and would take most of the room. We then decided to buy a nice webcam and see how it fit. When it arrived we found that it was much bigger than the other (being about 3.25" long).
 |
| LED modules with two Pi-Cameras |
With the new cameras and the decision to try and move the LEDs back inside the dome with the cameras we changed our plan entirely. We decided to have one nice webcam for streaming video, and having two pi cameras on board to do stereoscopic vision.
 |
| 3 Cameras with LED strip |
Another factor in choosing our cameras has been the video quality. After testing various different streaming methods (all can be found here) we settled on using a combination of cameras. For the live video feed we settled on using MJPG-Streamer on the BeagleBone with Logitech's C920. For the stereoscopic vision we decided to use two Raspi-Cameras. Both can be seen in the CAD images above (RPi are the small square ones, the C920 is the long one). While driving, the user will only be using the C920. The RPi cameras will only be used to take images and record video (and are specifically placed where they are for stereoscopic vision. An image of the C920 out of it's case is below:
MJPG-Streamer was chosen out of the various different streaming methods (GStreamer, Motion, FFMPEG, MPlayer w/ Netcat) because of its speed and compatibility. Not only can it handle 30 fps, but the stream can be picked up by OpenCV running on the OCU.
The last step with the cameras was potting them. We 3-D printed boxes for the cameras to fit inside of, as well as a place for a rod to go through the system so it could be tilted. The picture below is of the cameras epoxied into their boxes, and below that is a CAD model of the entire system in place.
5.21.2014
BeagleBone: MJPG-Streamer + C920
One reason for testing the BeagleBone Black was because of its processing capabilities. After some research it seemed as if it would work well streaming video. We decided to try MJPG-Streamer (which we had previously tried here on the Raspberry Pi) with Logitech's C920 Webcam. We chose to use this camera because of its HD capability, onboard H264 video encoding, and USB compatibility. Below is the camera taken out of its case:

The dependencies need on the BeagleBone and for the C920 are slightly different. First update and upgrade your operating system to insure that everything is up-to-date:


Below is a list of the correct dependencies. All work with apt-get install (for example, to install g++ use sudo apt-get install g++):

The dependencies need on the BeagleBone and for the C920 are slightly different. First update and upgrade your operating system to insure that everything is up-to-date:
Below is a list of the correct dependencies. All work with apt-get install (for example, to install g++ use sudo apt-get install g++):
- g++
- cmake
- build-essential
- imagemagick
- pkg-config
- libv4l
- libv4l-dev
- v4l-utils
- v4l2ucp
- libjpeg8-dev
Now with the dependencies installed you can download MJPG-Streamer from our forked repository:

Make a symbolic link to the videodev2.h file:

Finally, install MJPG-Streamer:

After setting everything up there still may be an error that says the V4L2 Device isn't loaded. This happens because the uvccamera module is not loaded. To load the module:

You might need to switch between loading and unloading the module to get MJPG-Streamer to work. To unload the uvcvideo module use this command:

To play the video use the MJPG-Streamer commands and view it from the webserver (https://<localhost>:8080)!:

You should see a 1280x720 image with 30 fps! A clear, crisp, and speedy stream. Perfect for the submersible. After a long, long journey looking into the different streaming methods available, it seems that MJPG-Stream is the best option for our project.

You should see a 1280x720 image with 30 fps! A clear, crisp, and speedy stream. Perfect for the submersible. After a long, long journey looking into the different streaming methods available, it seems that MJPG-Stream is the best option for our project.
5.20.2014
RasPi Camera: MPlayer and Netcat
After using GStreamer while moving the base of the camera we found that the image became very distorted. Using this in our submersible therefore wouldn't be possible. We then looked into other streaming methods using the Pi camera.
Although the MPlayer and Netcat combination is the recommended streaming method for the Pi's h264 video it wasn't as fast as we had wanted at first and had terrible latency. This combination almost matched MJPG-Streamer in speed, but unfortunately did not do well with a lot of movements at once.
Software:
Although the MPlayer and Netcat combination is the recommended streaming method for the Pi's h264 video it wasn't as fast as we had wanted at first and had terrible latency. This combination almost matched MJPG-Streamer in speed, but unfortunately did not do well with a lot of movements at once.
Software:
- Netcat (Windows) ---> Chrome might block this download. Try Internet Explorer.
- MPlayer (look in MPlayer and Netcat for Windows folder)
Both of the above programs are located on our download page precompiled. The Netcat download should already be compiled and we thought it would be nice to share the MPlayer software as it was difficult to compile. If you would like to compile from source you must first download MinGW and then use its GCC compiler (directions on doing this can be found here). If you would rather not, the MPlayer download can be found on our downloads page in the folder MPlayer and Netcat can be found using the link above.
After installing MPlayer and Netcat on your Windows machine, streaming the video is extremely easy.
Command on the Raspberry Pi (w/ RasPi Camera):

Command on the Windows machine within the directory containing both MPlayer and Netcat:
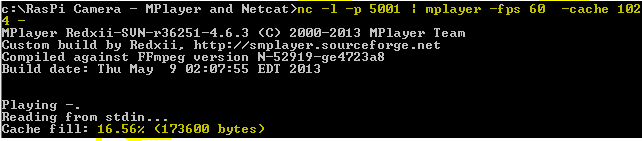
And it's that easy!
We have found that in order to decrease the video latency, stream from the pi at a specific bite-rate (-b) and at a smaller frame rate then MPlayer is reading the stream, but it does not even compare in speed to other streaming methods.
This streaming method is the expected streaming method for the Raspberry Pi camera. Although there are ways to speed up the stream (namely reading the video at 60 fps while streaming it at 30 fps) they are not realiable. At points it streams video with low-latency, but at others it lags unexpectedly. Our next video post will have our final video streaming decision....
After installing MPlayer and Netcat on your Windows machine, streaming the video is extremely easy.
Command on the Raspberry Pi (w/ RasPi Camera):
Command on the Windows machine within the directory containing both MPlayer and Netcat:
And it's that easy!
We have found that in order to decrease the video latency, stream from the pi at a specific bite-rate (-b) and at a smaller frame rate then MPlayer is reading the stream, but it does not even compare in speed to other streaming methods.
This streaming method is the expected streaming method for the Raspberry Pi camera. Although there are ways to speed up the stream (namely reading the video at 60 fps while streaming it at 30 fps) they are not realiable. At points it streams video with low-latency, but at others it lags unexpectedly. Our next video post will have our final video streaming decision....
1.25.2014
RasPi Camera: GStreamer-1.0 w/ Windows 7
As talked about in our previous post, the MJPG-Streamer video rate using the Pi's Camera module was definitely not acceptable for our project. The maximum speed (with dropped frames)of raspistill was far below the video quality needed for our project. After researching multiple different streaming methods we settled on using GStreamer-1.0, an open source visual and audio streaming platform. This method is faster as the software opens up a direct network pipeline between the Raspberry Pi and the OCU (in this case a Windows 7 machine).
This tutorial is Windows 7 specific, but will work on Mac and Linux. The tutorials for Mac and Linux are actually much easier as GStreamer was originally created for those platforms.
1a. First prime the Pi by adding the follow to /etc/apt/sources.list:

2a. Then update the Pi to download dependencies for GStreamer:

3a. Finally download GStreamer-1.0:

2b. Install!
3b. Using cd and dir navigate to /gstreamer/1.0/64_x86/bin

4b. Now you can use the get-launch-1.0.exe command to read the stream coming from the Pi (make sure to use the ip you found using ipconfig above!).

As you can see the quality of the stream is as good as the Pi Module can give. Unlike the jerky MJPG-Streamer, the GStreamer pipeline has <.3 seconds of delay!! This is perfect for our Pi-based submersible. Unfortunately, there is not yet a Java API built for GStreamer-1.0. We will be defaulting to the older version (GStreamer-.10) in order to use this video streaming software.

This tutorial is Windows 7 specific, but will work on Mac and Linux. The tutorials for Mac and Linux are actually much easier as GStreamer was originally created for those platforms.
1a. First prime the Pi by adding the follow to /etc/apt/sources.list:
2a. Then update the Pi to download dependencies for GStreamer:
3a. Finally download GStreamer-1.0:
4a. The download is complete. To pipe raspivid through GStreamer use the command below.

****Make sure to use this specific code because GStreamer-1.0 for Windows does NOT include gdpdepay or gdppay as plugins.
1b. In Windows, visit http://gstreamer.freedesktop.org/data/pkg/windows/1.2.2/ and download this (make sure you have the correct installer -- Windows 7 comes with a pre downloaded .msi installer, but other versions do not):
2b. Install!
3b. Using cd and dir navigate to /gstreamer/1.0/64_x86/bin
4b. Now you can use the get-launch-1.0.exe command to read the stream coming from the Pi (make sure to use the ip you found using ipconfig above!).
As you can see the quality of the stream is as good as the Pi Module can give. Unlike the jerky MJPG-Streamer, the GStreamer pipeline has <.3 seconds of delay!! This is perfect for our Pi-based submersible. Unfortunately, there is not yet a Java API built for GStreamer-1.0. We will be defaulting to the older version (GStreamer-.10) in order to use this video streaming software.
1.12.2014
RasPi Camera: MJPG-Streamer Comparison
After playing around with different USB webcams we decided to test out video hardware/software specifically made for the Raspberry Pi. Although having the ability to attach a USB cam to the Pi opens up many possibilities, our hope is to have a video platform which streams high definition video with the lowest possible latency. While USB cameras have a relatively nice picture, they have higher latency than we would like. Below is a quick run through on how we setup the Pi Camera and it tested against a USB camera using MJPG-Streamer


After rebooting both update and upgrade the Pi:


Pi Camera
We used the Pi Camera Module (found here). A picture of the module is below. To view the post where we got a lot of our information on the Pi Module check out this blog post:
To attach this hardware find the black clasp near the Ethernet jack and pull up on the tabs. Take the ribbon cable on the module and slid it into the clasp (making sure that the wires on the clip and cable are touching). Now press down on the tabs. Done! The module is correctly attached to the Pi. A picture for reference is below:
Next you need to enable the RasPi Camera from the Pi's configuration window. Do this by running:
And choosing this option in the configuration window:
After rebooting both update and upgrade the Pi:
To compare the streams we are going to test MJPG-Stream on the Pi Module and a USB webcam at the same time. We will not be testing the native streaming at this point because of a few disadvantages (ie. you must always be done before you tell the Pi where to stream video to). Use the links on this page to help you setup native streaming with the Raspberry Pi Camera Module. Otherwise, continue reading.
Next you have to install MJPG-Streamer. Documentation for this can be found on THIS post (or this very useful blog). After MJPG-Streamer is compiled you must make a file to which the RasPi video is copied to and then read from by MPJEG-Streamer.
First make a directory to which you can save the images:

Then make it writeable:

*****you must constantly created /tmp/stream and make it writeable or the stream will not work!
You now mush run a raspistill image capture at a very small interval. This is used for video because MJPG-Stream is only compatible with jpeg images and not the h264 video created by raspivid. The command below will have the stream capture every .1s: (for information on the meaning of these commands check out this blog post).
First make a directory to which you can save the images:
Then make it writeable:
*****you must constantly created /tmp/stream and make it writeable or the stream will not work!
You now mush run a raspistill image capture at a very small interval. This is used for video because MJPG-Stream is only compatible with jpeg images and not the h264 video created by raspivid. The command below will have the stream capture every .1s: (for information on the meaning of these commands check out this blog post).
Then run MJPG-Streamer. MJPG-Streamer will both read the pic.jpg created by raspistill and write it to a web-server.
To log onto the webserver type in the <http://ip:port> into your web browser. In this case it is <http://port:9000>. Here is an image of what you should see:
Comparision: USB and RasPi Module:
After setting up the Pi Camera module we tested it against using MJPG-Streamer and a USB webcam.
Pi Pros:
- Small!
- High quality
Pi Negs:
- SLOWER
- Easily backed up (skipping frames because it cannot write any faster than .1s
USB Pros:
- Faster
- Customizable
USB Negs:
- Larger camera
- Not as nice quality for the price
Conclusion:
We would recommend using a USB webcam for streaming live video from the Pi using MJPG-Streamer because of its fluidity compared to raspistill. The raspistill feature on the pi camera is meant for taking images and does not take them at a pace not fast enough for a robot. We have not given up on using the Pi Camera module though...stay tuned for a tutorial using the camera's native streaming software! Next time we'll compare the native streaming against MJPG-Streamer.
10.13.2013
RPi Video Streaming: MJPG-Streamer
MJPG-Streamer was the last pre-built video streaming software we tested. It was something that we had looked into earlier in the summer, but had never followed through with. It is comparatively "lighter" than both Ffmpeg and Motion. It was fairly easy to download and compile although you do have to jump through a few loopholes.
1. Use your laptop to download and unzip the MJPG-Streamer software.
2. Forward the folder from your desktop using a secure shell connection (scp forwarding).


3. Login to your Raspberry Pi and download the following dependencies.
--------> Update the Raspbian Operating System

--------> Install dependencies (libv4l-dev, subversion, libjpeg8-dev, imagemagick)


4. Copy the following file to a different name (MJPG-Streamer will show a make error otherwise). Try this a few times as it may not work correctly the first time.

5. Then, just for good housekeeping, Clean All and then run the Makefile.

7. Now you're ready to stream using MJPG-Streamer. Enter the following command. It will hopefully inform you that the stream is up and running. Our stream is running at 20 frames per second, at a resolution of 1280x960 pixels on the port 8092.
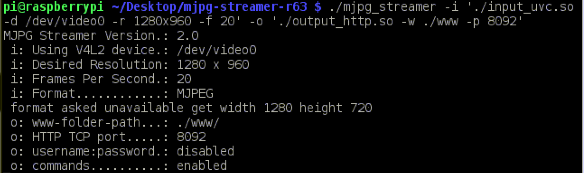
To customize the settings (fps, resolution, and device) you can change the values that follow these letters:

8. To view your stream open up Firefox (or Chrome) and type in the ip of the Pi followed by the port # (i.e. http://10.0.1.201:8082). You should see the following:

9. Obviously you will not always want to view your stream over this page. To view this same stream directly open VLC and type in the following:

The direct stream should look like this:

After long nights testing different camera's and there capabilities we finally found one worth the effort. MJPG-Streamer is the best universal USB video streaming software we've used. We would recommend this over Motion and Ffmpeg because of its fluidity and response time.
To see how we have integrated MJPG-Streamer into a friendly Java GUI check out this post.
Subscribe to:
Posts (Atom)