2.18.2014

Waterproofing a Tru-Stability Pressure Sensor w/ Arduino

Our spooling mechanism is going to unspool/spool our tether based on the depth of the submersible (+/- a margin of error). Therefore, as part of the float we need to design a depth sensor capable of traveling up to 250 feet underwater (roughly 105 psi). After much searching, we settled on using Honeywell's Tru-Stability Force Sensor to do this. We purchased the SSC 150psi model with a 5v logic and analog output. Below is a quick example of how to use the Tru-Stability Sensor, which is followed with how we waterproofed the sensor. This is the data-sheet we used.

SSC 150 psi


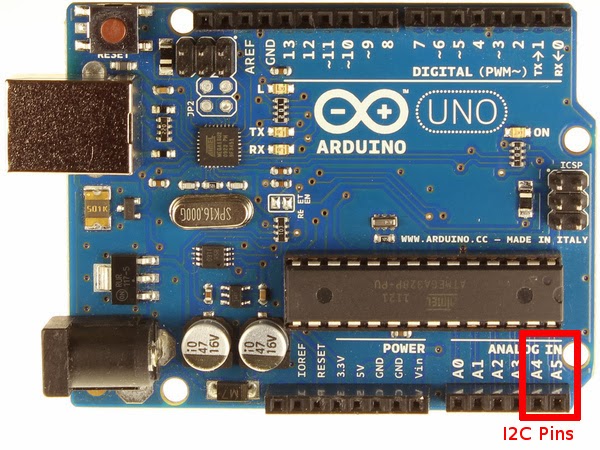
1. Hook up the Sensor using the 5v, A0, and Ground pins. Our sensor is pictured below. The pin-out is also pictured (analog version -- Table 9). If you have a different sensor just use this data sheet to find the drawing of your sensor and the tables below to find the correct pin-out.

SSC 150PSI (take note of pin locations)

Sensor Pin-Outs


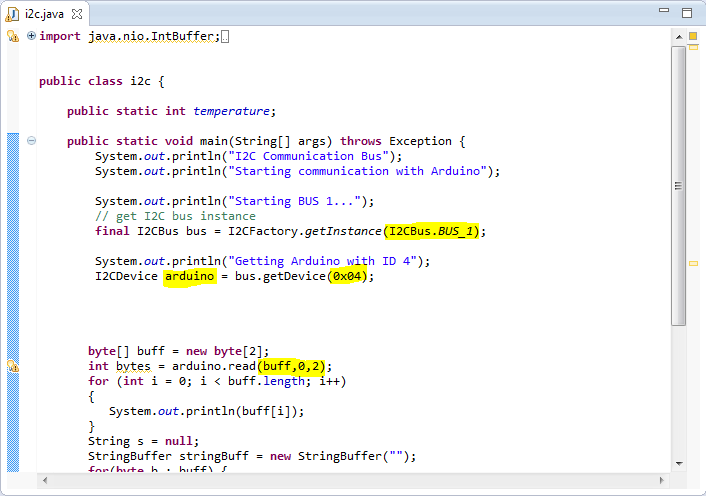
2. Upload the SSC150.ino sketch located in the "SSC150" folder here. The code is based off of the data table and equations found on Page 6 of the data sheet (and pictured below). A shout of to a forum post (which I have sadly lost...) which mentioned the equation needed to calculate pressure.


B.N. -- Our sensor is based off of 5v logic


3. Upload the sketch to your Arduino to make sure it's working. If you are around 1 atm (sea level) the PSI should read around 14.70, the feet around 0.00.

B.N -- This sketch does not currently calibrate itself when powered. This is because our submersible might lose power 250 feet underwater and we don't want the sensor to automatically calibrate when rebooted at that depth. Therefore, in the finished product there will be a specific boot sequence to run through before using the submersible.


4. We then chose a sturdy PVC pipe drilled some holes, added the sensor (with soldered wire extensions), and siliconed everything to waterproof the connections.


We then had an issue deciding on how to have the sensor measure pressure. Should we use a homemade manometer or a balloon to sense the variation in pressure? What about a flexible latex covering? PSI increases in increments around .4 psi/foot of H20  and because our submersibles tether is going to be based on depth, we needed a setup which gave us the most accurate readings. In the end we decided on using a manometer because we were able to read a large enough pressure difference per foot.

The sensor is siliconed to a tube which exits the PVC and is exposed to the water. Our sensor was sealed to this small diameter tube. Not water can enter the tube when submerged because of the cohesions of the water and the fact that one end of the tube is sealed As the sensor descends, the water pressure increases the air pressure in the tube. Below is a picture of the finished sensor:


Sensor w/tube

Finished sensor

I tested this sensor at the local pool with my sister (thanks Mackie L.!). We attached it to the top of a weight a dropped it roughly 3.8 feet (4 feet minus the width of the weight). Below are the readings from the sensor and a picture of it in the pool (H2 in the Arduino code should be H20).


Pressure submerged in pool


Sensor at 3.81 feet


Although this setup worked, it still needs to be tested to depths up to 250 feet in salt water. Hopefully it will continue to work, but you never know. Stay updated for more posts about completing the float!

2.02.2014

I2C: Raspberry Pi, Arduino, and Pi4j

After realizing that we may need multiple sensors (ie. pressure sensor) and micro-controllers (ie. Arduinos) attached to our Raspberry Pi's in the submersible, we decided to try other types of communication. After reading through articles dedicated to different communication protocols, we eventually chose to use I2C (i-squared-c) communication. I2C stands for Inter-Intergrated Circuit and is a type of serial bus (for more detailed information check out Wikipedia).

This communication protocol is used for easy, three wire connection between devices. The bus is comprised of Ground, SDA (Serial Data Line), and SCL (Serial Clock Line). The master node on the bus generates a clock and initiates the communication with the slave. Likewise, the slave node receives the clock and responds when addressed by the master. In our case, the Arduino is the slave while the Raspberry Pi is the master.


Software:

Hardware:
  • Raspberry Pi Rev B
  • Arduino Uno and Arduino Mega
  • Connector cables


The setup used in this tutorial connects the Raspberry Pi and an Arduino on an I2C bus. Below is an image of the SDA and SCL pins on the Raspberry Pi's GPIO setup and Arduino Uno (A4 & A5):


After connecting the correct pins (don't forget ground!), setup i2c between the Pi and Arduino using these quick steps:


1. Comment out (#) the i2c option (and SPI too) on the Pi's blacklist:


2.  Add i2c to /dev/modules


3. Now you can download the i2c-tools needed for debugging:


4. Finally, make sure to add "pi" to the user list unless you want to run your commands using SUDO.


5. Add the .jar files found on Pi4J's download page to the Pi's Java PATH (this will allow you to run the file using java -jar) and as an external library in Eclipse. To add pi4j-core.jar to your Pi, move it from its temporary location to the following location (/usr/lib/jvm..../lib):


6. Download the Java code pictured below. The code can be found in the folder mentioned in the software section above. The highlighted sections below show that the Pi first joins the i2c bus, then locates the Arduino with address 4, and finally reads a set buffer of size 2 from the "slave". For more information on the specific Pi4J methods and implementation check out this site.


7. You are now finished loading the i2c kernel on the Raspberry Pi. Upload the code from the folder in the downloads sections (.ino file), although the code below is complete and ready for use.


8. Attach the Arduino to power and type in the following command on the Pi. You should see this table below. The Arduino should be recognized as the 0x04 device on the bus (the command for the RevA RPi would switch from a 1 to  0 after -y).


9. Finally, run the .jar file called i2c-temp.jar on the Raspberry Pi (this file will reads two bytes from the Arduino). You will see the same two bytes on the Pi 's terminal. These should be the same numbers you send from the Arduino. An image of the result is below (please disregard the J5 at the bottom of the image):


As we said above, i2c communication not only has the benefit of using only three wires, but it is  able to connect more than 127 devices to the Pi at once.


=============
The Arduino code used above will be modified in the future to transfer depth, temperature, and various other readings to the Pi using this circuitry. Please note that Pi4J using the Arduino as a slave  on the i2c bus is far from perfect – we ran into many problems testing this over the past week. Some of our findings (inadequacies) can be found in the Arduino (.ino) file on the downloads page we provided above.