This is an example from Arduino.cc. This has some problems with it and we would recommend that you follow our example below.
Software:
- Eclipse
- Latest Arduino IDE (need the .jars)
- use this link for steps on how to download the Arduino Drivers on Windows 7
- RXTX 2.1-7 (for Raspberry Pi and 32 bit Windows)
- RXTX 2.2 (for 64 bit Windows machine)
- Java code found here (includes Client/Server configuration ----> very easy to change).
Windows 7:
1. Open Eclipse and then start a new project.
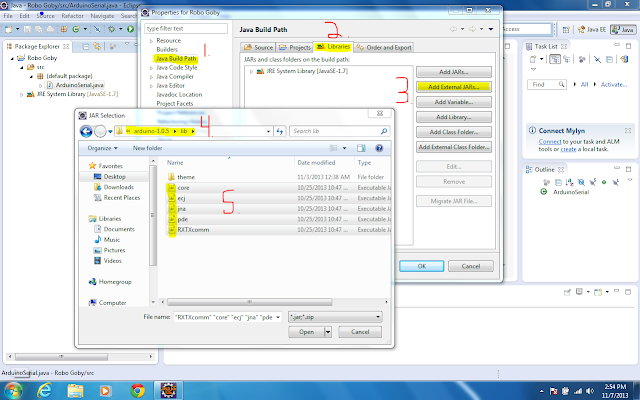
2. Create a class called ArduinoSerial(). Import the .jars from the Arduino download into the Referenced Libraries found in the build path (example in the image below).
3. Add rxtxSerial.dll and rxtxParallel.dll to your PATH (usually C:\Windows\system).

- for 64 bit machines upload the RXTXcomm.jar from the link above.
3. Add rxtxSerial.dll and rxtxParallel.dll to your PATH (usually C:\Windows\system).

4. Download the Java our code (modified from this site). Copy n' Paste it into the ArduinoSerial() class.
5. Change the communication port (COM, tty, etc). On Windows 7 it will be "COM x" (depending on which COM port you are using)
6. Upload a program onto the Arduino (use Baud 4800**)

**on the Raspberry Pi a Baud rate of 4800 was ideal. It's a bug which needs to be worked out, but for now stick with 4800 bytes per second.
Raspberry Pi:
1. Change device name on ArduinoSerial. On the Raspberry Pi it will be "/dev/ttyAMA0". If you do not know which /dev device to use on the RPi follow the directions on the bottom half of this post.
2. Reconfigure the RXTXcomm.jar in the above example and use the Arduino IDE version.
3. Export the ArduinoSerial() class as an executable JAR. Copy it onto the RPi's desktop.

4. Download the Linux version of RXTX library with this command (downloads RXTX 2.2pre2):

5. Copy the Linux folder from the RXTX 2.1-7 download to the /tmp folder on the Raspberry Pi.
6. Copy the RXTXcomm.jar file from the above into /tmp.
7. CD into the Java Virtual Machine library PATH (/usr/lib/jvm/java-7-openjdk-common/jre/lib) and move the Linux folder into it.

8. Then cd into /ext and move the RXTXcomm.jar into it.

9. Plug in the Arduino the the Raspberry Pi. Run the executable file on the Desktop.

10. You Should see something like this (the Arduino is sending temperature readings):

As you can see the libraries are mismatched. This goes away if you use the RXTXcomm.jar 2.2pre2.
For some reason the RXTX download on Qbang says it's 2.2pre2, but it is actually 2.2pre1....what!?
6. Upload a program onto the Arduino (use Baud 4800**)
7. Quit Arduino, and then run ArduinoSerial(). You should see this (text varies w/ Arduino code):

**on the Raspberry Pi a Baud rate of 4800 was ideal. It's a bug which needs to be worked out, but for now stick with 4800 bytes per second.
Raspberry Pi:
1. Change device name on ArduinoSerial. On the Raspberry Pi it will be "/dev/ttyAMA0". If you do not know which /dev device to use on the RPi follow the directions on the bottom half of this post.
2. Reconfigure the RXTXcomm.jar in the above example and use the Arduino IDE version.
3. Export the ArduinoSerial() class as an executable JAR. Copy it onto the RPi's desktop.

4. Download the Linux version of RXTX library with this command (downloads RXTX 2.2pre2):
5. Copy the Linux folder from the RXTX 2.1-7 download to the /tmp folder on the Raspberry Pi.
6. Copy the RXTXcomm.jar file from the above into /tmp.
7. CD into the Java Virtual Machine library PATH (/usr/lib/jvm/java-7-openjdk-common/jre/lib) and move the Linux folder into it.
8. Then cd into /ext and move the RXTXcomm.jar into it.
9. Plug in the Arduino the the Raspberry Pi. Run the executable file on the Desktop.
10. You Should see something like this (the Arduino is sending temperature readings):

As you can see the libraries are mismatched. This goes away if you use the RXTXcomm.jar 2.2pre2.
For some reason the RXTX download on Qbang says it's 2.2pre2, but it is actually 2.2pre1....what!?
I can't extract the zip file.
ReplyDeleteThe zip file extracted just fine for me. If you're using Windows try downloading this free software and use it to unzip your files:
Deletehttp://www.7-zip.org
Otherwise you should just google how to extract .zip files using your specific operating system.