After deciding to continue with Project RoboGoby this summer we decided that having an in-depth CAD, or Computer Aided Design, of the submersible was the best way to plan Version II. This post, which is about the initial CAD of sub, allowed us to flush out all of our ideas and not worry about specifics. This gives us the freedom of designing the submersible how we want to and then thinking more about specifics later on. The second round of CAD (which will be done for each of the major pieces) will focus on the specifics before machining parts.
As part of the initial design phase we broke the submersible up into three distinct pieces — the front section, the middle, and the rear section. Each of the sections are important to the overall design yet still describe the general ideas for the finished sub. Below each of the sections are quickly explained and an images of each section is provided.
We also used the coloring scheme in CAD to color different parts in our design to easily tell what material each piece is going to be made out of. This key will help you in understanding all of our CAD designs for RoboGoby II.
CAD Key
Printed PLA ----------> Black
Delrin -----------------> Green
PVC -------------------> White
Aluminum--------------> Grey
Polyethylene -----------> Pink
Tapped Holes --------> Yellow
Paint----------------------> Red
--------------------------------------------------------------------------------------------------------------------------
--------------------------------------------------------------------------------------------------------------------------
UPDATE (7/13/2015): Threaded Inserts
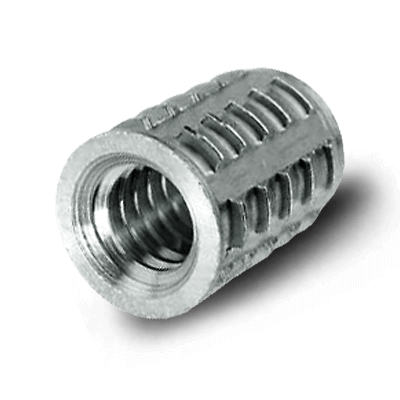
We will also be using RED to represent the holes we are using threaded inserts in. The threaded inserts look like this:
 |
| 6mm Threaded Insert |
And the CAD'ed plastic holes will look like this:
It is designed to be pressed into wood/thermoplastics and is perfect for using in common 3D printed plastics to make use of bolts as printer plastic is notoriously hard to tap. We will be using these in most if not all of the future 3D printed pieces.
It is designed to be pressed into wood/thermoplastics and is perfect for using in common 3D printed plastics to make use of bolts as printer plastic is notoriously hard to tap. We will be using these in most if not all of the future 3D printed pieces.
--------------------------------------------------------------------------------------------------------------------------
Front
The front section houses our camera, lights, sensors, and two of the side thrusters. This section was therefore one of the more complicated of the sections to design as it includes many different components. Below is a transparent image of the front section of the submersible. You can see the horizontal and vertical thrusters which are placed behind the variable pitch camera and lighting system. |
| Front Section |
Middle
The middle section of the submersible houses most of our electronics and all of our electronic controllers. This section has been designed to be waterproof in pressure exceeding 150 PSI. Much of the complicated work in this section will be done when mounting our electronics and connectors on the inside. For now the main part of this section is the double o-ring plug you can see in the transparent part of the image below. This plug ensures that everything stays waterproofed while still giving is easy access to the electronics inside.
 |
| Middle Section |
Rear
The rear section is almost completely thrusters (in the future it will have a power connector). Currently it contains side thrusters symmetric to those in the front (vertical and horizontal), but also has our large rear thruster, cone, and nozzle which are extremely important to the submersible.
 |
| Rear Section |
Stay tuned for future posts with more detail explanations about the design of the components of each of the sections.

Thank you for sharing this post.
ReplyDelete