Before reading this you should get acquainted with our design by reading about the CAD models for the
small thrusters. As a brief intro, the small thruster is made up of four different parts: the grills, motor mount, thruster curtain, and curtain mount.
Grills
The grills are designed to keep large debris out of the small thrusters. Each thruster has two grills, one on each side of the thruster (to block both ends). We printed all of our grills on a MakerBot Replicator with PLA. The grill sits flat with the exterior of the sub and has 6x.125" spokes to stop material from getting caught in the 2" thruster.
 |
| Printed Grill |
Motor Mount
The motor mount was cut out of .25" Delrin. Delrin's material properties allow it to be both strong, easy to machine, and, therefore, also nice to tap. Although it is a close cousin on acrylic, is does not shatter or crack as easily.
We went through two different iterations of cuts before we perfected our motor mount. Similar to the grill the motor mount has 6x.125" spokes so they line up with each other.
 |
| Motor Mount on CNC |
 |
| Motor Mount |
Thruster Curtain
Version 1
The first version of this years Thruster Curtain was very similar to last years. We cut out 2" PVC pipe and used the lathe function of a Stinger CAMaster CNC router to cut slots in it. These pieces cut out very quickly, but were slightly off due to the imperfections from the lathe.
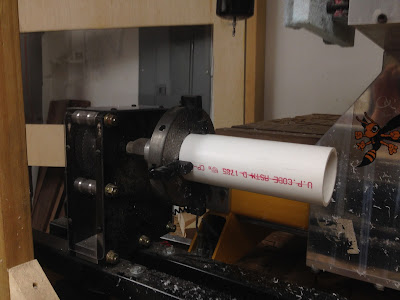 |
| Lathe attachment on CNC router |
 |
Finished PVC Thruster Curtain
|
Along with the first version of the Thruster Curtain we made a curtain mount. This mount is used to permanently mount one end of the PVC to the aluminum body.This piece was also cut out of Delrin (like the motor mount).
 |
| Thruster Curtain Mount (PVC flavor) |
Version 2
While the first version of the thruster mount worked well, it was relatively hard to make and imprecise (all due to the lathe function on the CNC router). In Version 2 we decided to 3D print our Thruster Curtains using PLA plastic and a MakerBot Replicator. This was
much more precise giving us a better result with less effort!
 |
| Printed Thruster Curtain |
Assembly
Version 1:
First we used epoxy to glue the Delrin thruster curtain mount to the PVC pipe (thruster curtain). This is a permeant attachment and holes the curtain in place while the sub is running.
 |
| Epoxying |
 |
| Epoxy drying |
Although epoxying the curtains together worked well, we decided to use the printed curtains instead.
Version 2:
Assembling the printed curtains for the through hole thruster was easy. We just needed to add M4 threaded inserts to the printed plastic to allow us to mount the curtain using bolts. To do this, we heated them up with a heat gun, pressed them into the plastic, and then mounted them in place. This allowed them to cool and set in the correct orientation.
 |
| Threaded Insert |
We then mounted our
finished motors to the Delrin motor mounts.
 |
Motor in Mount
|
 |
| One Mounted Motor |
 |
| Five Mounted Motors |
Note:
While it is hard to see in these pictures we wanted to make sure that the bolts didn't protrude from the mounts, so we got M3 bolts that have beveled heads, allowing us to sink them into the delrin mounts.
And here the mounted motor is fit inside of the thruster curtain:
 |
| Motor in Curtain |
 |
| Motor in Curtain Size Reference |
To finished mounting the thruster we pressed the grills into the holes in our aluminum body and slid the thruster curtain/mounted motor combination into place. We then used six M4 bolts (three on each side) to mount the thruster in place.
 |
| Two Mounted Thrusters |


Very nice! Now comes the reliabity analysis! One important test would be collision under angles. Underwater impact forces are different as the water monentum makes impacts last longer.
ReplyDeleteHi thanks for posting thhis
ReplyDelete"Enhance your data analysis skills with power bi and tableau courses designed for beginners and professionals alike. Learn to visualize, interpret, and present data effectively using these top business intelligence tools."
ReplyDelete